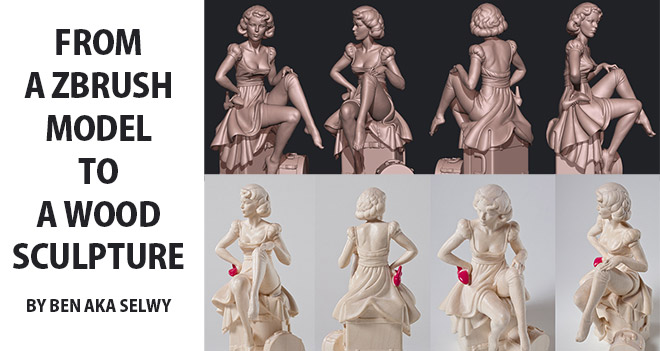
From a ZBrush model to a wood sculpture by Ben aka Selwy
Ben aka Selwy is a digital sculptor, specialized in high-poly modeling and sculpting. He worked on a freelance basis for many different studios and companies around the globe, like Ubisoft, Hasbro and Axis Animation etc. He has a master’s degree in traditional wood carving. He believe in sculpting is reliving a Renaissance through the transfer into the digital world and it’s exciting to be a part of it. In this post you will see the process of Ben’s Zbrush Model to a Wood Sculpture.
1. Digital Sculpting
ZBrush allows me to create and sculpt the model entirely on the computer; from concept to final sculpture. I’m able to change things based on client’s feedback quickly, with no need of making laborious changes on a clay model for instance. What He have to keep in mind is, that the outcome will be a physical object and in this case, an object made out of wood. As you already know for sure, wood consists of fibers that growth in a certain direction. Therefore it’s necessary to avoid thin parts that go across that wood grain. They break easily. When He work with different subtools, He always make sure that the meshes are closed and watertight surfaces and intersecting with each other. You can do that, by starting with a ZBrush primitive for your basemesh and turn it into a dynamesh. A dynamesh will always force a closed surface by closing holes automatically.
2. Preparing for 3D Printing
When I’m done with sculpting, He make use of the “decimation master” plug-in and reduce the polycount. A super-highres mesh isn’t necessary for printing. Most of the time He merge all subtool before He export the geometry as an STL file with the “3D Print Exporter” plug-in. He use Magics RP from Materialize to combine all shells to a single shell and to fix mesh errors, in case the model has any. Removing shells is necessary for giving your sculpture a wall thickness later on. You don’t have to use an external application for merging shells. Merge all subtools to a single subtool in ZBrush and turn the whole thing into a higres dynamesh (with the project function enabled to keep your details). By doing that, you can get rid of the polygons at the inside of your model. In Magics RP He define a wall-thickness and perforate the sculpture, so the dispensable powder can be removed after printing.
3. Prototype and Production printing
For production on the pantograph (see point 4 below) you need to work on a reference model that is at least twice as big as the final wood figurine. That’s necessary for transferring all the small details to the wood and makes it a lot easier to work with, because you must trace the surface by hand on the machine later on. But before He order the big printout for production, He go for a small version, ideally the size the final wood sculptures will be, to see how the model looks as a physical object. Whenever He feel something doesn’t look right, He go back to ZBrush and try to fix it (composition, balance…) He normally use Shapeways (www.shapeways.com) for printing. They have Z-Corp printers for a printout in Sandstone (works great for all prototype models) and big laser sinter machines for printing a very strong nylon/plastic. That’s exactly what He need for the pantograph.
4. Production on the Pantograph (3d profiling machine)
He fill the double sized plastic 3D printout with a special resin and mount it on a metal plate. Everything has to be assembled very strong to prevent it from bending or changing its position during tracing on the machine. The tracing itself isn’t an automated process yet; you still have to do it by hand. And you have to be super careful. Oh boy, in a moment of carelessness you can ruin a whole row of figures! You start with some bigger milling heads for rough machining and switch to the smaller once for detailing. He use maple wood for his work. It doesn’t change its color over the years and allow very fine details.
5. Finishing and Refining
The figures that come straight from the pantograph look great but aren’t finished yet. It needs a lot of sandpaper work to smooth the surface. He add details with his set of small carving knifes and boost the once that disappear during milling. Finally He paint the parts He want to be painted and add a thin layer of wax that prevents the wood from getting dirty.
6. The final product
If you keep an eye on some production restrictions, (wood as a living material, the dimensions the pantograph allows, avoiding spots that are difficult to reach with the milling heads) the possibilities are endless!
Website: http://www.selwy.com/
Zbrush, Wood Sculpture, Ben, Selwy, 3D Modeling, 3d art, digital art, zbrushtuts.com