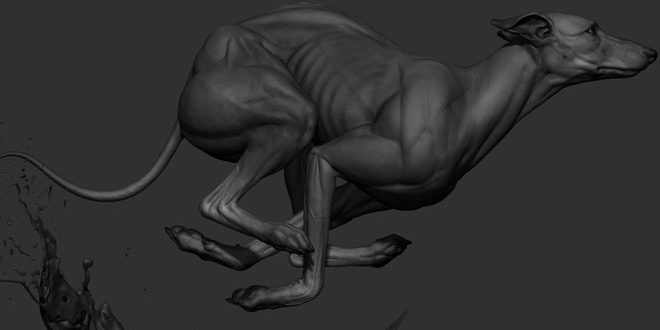
Greyhound Sculpture Workflow by Krystal Sae Eua
KRYSTAL SAE EUA is a Modeler, Texture Artist, Sculptor from Los Angeles, United States of America. In this post you will see an amazing digital sculpture Greyhound and its workflow by Krystal Sae Eua.
Find a dynamic pose
I do a lot of Google and Pinterest searches until I find something that speaks to me. Look for a good flow and balance to the pose.
Hint: Contrapposto, S curves and spirals are always a more appealing pose for a composition.
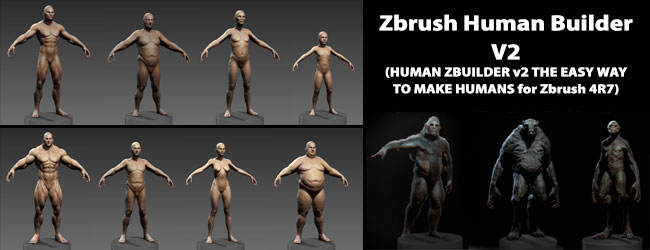
Zsphere
Zspheres makes it super easy to block in a pose and keep an eye on your subject’s correct proportions before starting a sculpt. You can also check to see if your chosen pose is really working early on. Use this time to ensure the proportions of your subject are correct.
Adaptive Skin:
Once you are happy with the chosen pose, you can Make Adaptive Skin to create a sculptable base mesh.
Primary forms
I use the Move Topological Brush and the Clay Tubes brush to block in the main forms of the figure. No need to divide the model until you build in the primary forms first.
Secondary Forms
After I am happy with the main forms, I will start to divide my mesh and build my secondary forms. I block in as much anatomy as possible without any fine detailing.
Dynamesh
Once I like the primary and secondary forms. I will run Dynamesh to even out my topology.
Hint: Make sure to have Groups ON. Then you can retain your polygrouping.
Important of Polygroups
Using Polygroups makes it easy to adjust and pose limbs and hard to reach sections of your sculpture.
All Brushes Used
Move Topological
For large changes to form. Use this first on your low subdiv level before tackling any details.
Standard(Customized)
For blocking in lines and sharper forms. I use this brush for all stages of sculpting. I use alpha 46 and increase my Roll Distance to 3.
Smooth
This is contantly in use. I tend to set my intensity much lower to have a more subtle effect when polishing forms.
Clay Buildup
For blocking in muscle and main forms.
Clay Tubes
I also use this brush to build muscle forms. It’s rough feel really helps put energy into your work.
Dam Standard
For fine lines and detailing.
Break Symmetry / Transpose Master
When I am happy with the forms and anatomy, I will then take this model and break symmetry. I will use Transform Master to adjust and balance my final pose.
Hint: This speeds things up while you’re learning to master anatomy by keeping symmetry to block in all of the main forms before adjusting muscle tension for the final pose.
Refine Anatomy
Keep using as much reference as you can to refine all of the anatomy of your piece.
Polypaint
I love using Polypaint to add life to my sculpts. Just grey values are enough to really help details pop. Desaturate photo reference to really get the right value range.
Base Sculpting
I sculpted the base with the idea of a water splash. I went to Badking.com to find a cool splash brush and build the rest off of that. I was able to find a nice composition guide by using the Move tool to push a PolySphere around. Then I dynameshed the tool and continued to sculpt based on the water flow direction.
Playing with Light
I constantly change my light direction to double check my forms. It also helps to have a very neutral material to view your model. It’s too easy to hide behind matcaps sometimes. A basic material will force you to fix your forms and make your sculpture sing in all situations!
Rendering
I will store my views using ZApplink Properties. Then I use the following shadow setting to render for a final presentation.
Hint: Make sure you change your Document size to be a higher resolution image.
Hint: After hitting BPR Render, export your Shaded render and Mask in order to easily composite them in Photoshop.
Greyhound – Keyshot Render
Website: http://sadpandaproductions.com/
Artstation: https://www.artstation.com/artist/iamsadpanda/profile
Digital art, 3d, 3d art, 3d modeling, 3d sculpting, zbrush, zbrush art, zbrush sculpting, zbrush modeling, zbrushtuts