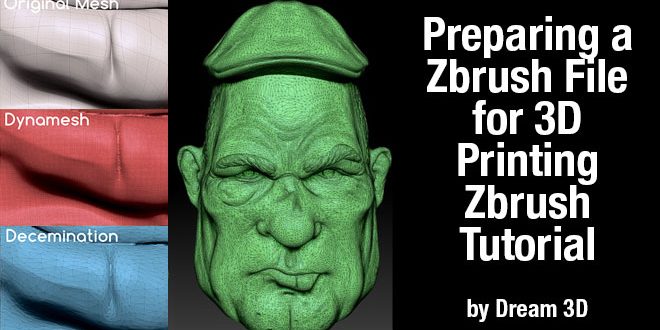
Preparing a Zbrush File for 3D Printing – Zbrush Tutorial by Dream 3D
In this video you will see how we prepare files with multiple subtools for 3D printing within Zbrush.
To start with if you have used any layers in Zbrush to detail your model you need to bake these into the geometry. This is as simple as clicking Bake All. The next step is to merge your subtools together if you have more than one object. For example if you have a sculpture of a head and decide you want to add a hat to it but want to print the two together as a solid object you need to merge the two together.
After all the merging is done, we can move on to retopologizing the model. This is where we will connect all the objects together so that there are no gaps in-between your subtools. My preferred method of doing this is to use the Dynamesh tool in Zbrush. With your object selected, raise the Dynamesh resolution to something like 1500 to 2000 and hit Dynamesh. This will make you one very hi res solid object. We couldn’t use this to send to our 3d printer software because the file would be massive and would most likely crash your desktop.
To avoid such frustrating scenarios occurring the next step is to use the Decimation Master plugin which comes with Zbrush. This tool can reduce down the amount of polygons in your model but retain alot of the detail you have endured to create. You must first select your object and then pre process it……this is where the computer does all the hard work while you grab a cup of coffee. Once it has computed you can then select a percentage of decimation you want to occur. This basically means how low do you want to go in terms of resolution. Once you have pre processed the object you can easily undo different levels of decimation and go back to the original giving you the freedom to quickly find the right resolution. When your happy you simply hit Process Current.

Now you just need to export your file. To do so Zbrush even includes a 3D Printer Exporter plugin which makes it as easy as selecting a size and then a file type. Now your ready to send your awesome design to the printer software and enjoy some time off while the printer does it’s thing!
Website: https://www.dream3d.co.uk/
Digital art, 3d art, 3d artist, 3d character art, character art, zbrush, zbrushtuts, 3d modeling, 3d, 3d sculpting, zbrush sculpting, zbrush tutorials, free zbrush tutorials, zbrush free tutorials